
Livery kits are not just large pieces of vinyl that you apply to your car. They can be an absolute game changer to the look, feel and style of your ride. They can completely redefine your experience as a driver. And most of the time, they will make you the center of attention whether you're at a car show or chillin' with the homies.
Rico's Garage specializes in making livery kits, not just for Nissan 350Z's, but for almost any type of vehicle you can imagine. We also offer our livery kits in a variety of colors and customization options designed to make your ride as unique as possible. For those who want to go one step further and build a completely custom livery kit for their ride, you can send us an email at shopricosgarage@gmail.com and we will turn your vision into a reality.
When you are ready to install your livery kit, you're going to need a few tools to make your life drastically easier:
- Automotive grade soap
- Soft bristle brush
- Clay Bar
- Blue Painters Tape or Any Type of Low-Tac Tape
- Squeegee
- Xacto Knife
- Patience (This one is critical)
When it comes to installation of livery kits, it's important to remember these 3 critical steps:
STEP 1 - CLEAN YOUR CAR
The livery kit you install on your ride is made to withstand the outdoor elements, but we want to maximize it's life as best as possible. This means making sure the surface is clean, clear and free of any contaminants.
Start by using your favorite automotive grade soap. Our favorite to use is Chemical Guys Mr. Pink, as it does a world class job of removing dirt and contaminants from your paint. If you haven't used it before, try it and see the difference. Don't forget to use a clean soft-bristle brush like this to avoid damaging your paint with scratches and swirl marks! Once you've cleaned and dried your car, go ahead and hit it with the Chemical Guys Clay Bar Quick Detailer Kit. The clay bar will remove any contaminants from the paint of your ride, leaving you with the best surface to apply the livery. Dirt can show easily under a livery, so do your best to clean your ride. We are looking for a smooth texture of the vinyl surface when it's all said and done.

If you can see your reflection in the paint, you did it right.
STEP 2 - SET THE LIVERY
Setting the livery is absolutely critical as it will help you to decide the placement of where the pieces will go. Using the trusty ole blue painters tape, set the livery exactly where you will want it to go.


By using blue painters tape, this will allow you to play with the livery elements and get them lined up the way you want. It's important to note that blue painters tape will not damage your paint, but will be strong enough to hold everything up while you get situated.
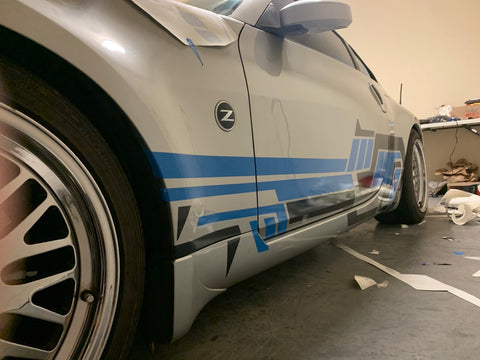
STEP 3 - APPLY THE LIVERY
Once the livery is set where you want it, go ahead and slowly remove the backing paper from the side and press the livery onto the surface of the car. Using a squeegee, remove any air bubbles or pockets that you come across while continuing to remove the backing paper. Going slow and utilizing patience will ensure that the livery goes on correctly and any issues can be handled quickly in the moment. Once the backing paper has been removed and the livery has been completely applied with all the air bubbles removed, it will be the moment you've waited for since placing the order: The removal of the masking layer. Starting from the same spot you began removing the backing paper, slowly peel and remove the top masking layer while continuing to check for any additional air bubbles or lift spots. Once the top masking layer is off, you are all done with that portion of the livery! From here, you will repeat the remaining livery layers until all have been installed.

Step 4 - ADMIRE YOUR ACCOMPLISHMENTS
This is the best step of the entire process. Once the livery has been installed, all air bubbles removed, and no outlying issues are left, it's time to take a step back, pull out your camera, and snap photos of your newly installed vinyl livery graphic. Crack open a cold beverage and admire the hard work you put in to making your ride unique and absolutely stunning.